Monday, April 26, 2010

Teaching at Jo-Ann Fabrics

This past Saturday, April 24th I had the pleasure of teaching 2 jewelry classes at Jo-Ann Fabrics in Arlington Heights, the store that I work at.

They were my first classes.  The current teacher had cancelled, and God was on my side when I overheard the managers discussing whether or not to cancel them, and disappoint 18 eager students.  I got the details, and told them that I could do it.  I had taught a small group before and was confident this was my thing!

I would be teaching Jewelry 101 for beginners to learn about tools, materials, beads, and starting to get the hang of using these things, plus clasps and making loops to attach component together to make jewelry.

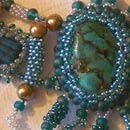
The second is Jewelry 201 for intermediate beaders.  We would each make a wire-wrapped pendant to attach to a necklace of different silver beads and findings.

So the manager took me up to the office and printed some papers for me.  Guidelines, teaching outline, project materials and so forth, for both classes.  I was very excited and nervous.  I had two days to produce the Wire-Wrapped Necklace pictured on the cover of the Jo-Ann Class brochure!  I was up very late the night before, and very early the morning of the 24th.  Too excited to sleep!

At the classroom I opened the jewelry materials cabinet and looked through what I had to work with.  I brought all of my own supplies as well, just in case.  Students began to arrive, and I was instantly no longer nervous as I began chatting with them about beads and wire.  I began right on time, and walked them through it.  I forgot to let them have a 10 minute break because we were all so excited.  They were great students!  They learned fast.  I never felt impatient with them.  I didn't teach them how to make wrapped loops though, because they seemed to have enough trouble with making their own headpins. Each student successfully finished a bracelet!  I was so proud of them.  I took them out to the aisle with all the beads and findings and talked more about wire and crimps and pliers.

I barely had time to prepare for the next class!  They started arriving, and had to wait for the two students from the first class who signed up right after the first class was over.  I was excited to teach them more!  This class didn't go quite as expected... as every student brought a different kind of pendant to wrap.  So with my expertise on wire, I visited each student individually to suggest to them how to wrap the item they had.  Some students had round pendants, when the supply list said square.  Two had chunks of flat semi-precious stone with no hole at all.  Easy fix though.  They all reported to have had a great time, and so did I.  Everyone here successfully made a necklace that they liked.

I had no idea that I had just worked for eight straight hours!  I LOVED it.  I had a great time, and I learned very much myself.  I couldn't wait to get home to bead even MORE.

My manager came to me in the classroom to talk to me.  And of course she always looks pretty serious, so I was instantly nervous she might say I totally forgot something, or didn't do something!  She said to me, "I haven't had so many compliments about a Jewelry teacher, Laura.  You will be able to do this again, right?"

I sighed with relief and nodded vigorously!  "Yeah!  I mean, this next month is going to be a bit nuts, what with the Bridal showers and the wedding and honeymoon and stuff, but I am ready to do this again!!"

Here's Jo-Ann's homepage. Click on the class Schedule!

Tuesday, April 13, 2010

20 questions YOUR BUYERS are asking!!

Our community shares the best small business tips with each other every single day in the Etsy Forums. I always reference this particularly helpful Etsy Forum post in my Virtual Labs workshops for sellers. (Find out more about these workshops here.) When I recently met MeganAuman in person and she mentioned that this Forum post inspired her to completely make over her item descriptions (which led to an increase in sales), I knew I needed to do a blog post about it.

20 Questions Your Buyers Are Asking by sparklerama
Etsy is full of amazing and beautiful things. It would be a shame if your beautiful work didn't sell because your description of the item left your customers scratching their heads.

This is a list to jump start your thinking when you write your next item description. Remember that your customer cannot see the item in person. Don't assume that the qualities of your item are obvious to your customer or that your photos say it all. (I have seen more than one item that I couldn't even figure out what the item WAS!). You might even consider describing your item as if you had no pictures for your customer to look at. Really make them feel like they are right there with your item.

This is not an all inclusive list and some questions may not be appropriate for all items or sellers. This list is just to get you thinking about some of the things your customer might want to know about your fabulous work.
  1. What is it? It may be totally obvious to you what the item is, but it might not be obvious to your customer.
  2. What color is it? The color on your computer monitor may not be the same as mine.
  3. How big is it? As a buyer I don't want to guess if that painting will fit over my fireplace or if those earrings are going to hang past my shoulders.
  4. What is it made from? What materials and techniques are used?
  5. How do I care for it? Can I wash and dry that wool sweater?
  6. Who should buy it? or Who should NOT buy it? Is it appropriate for pregnant women? Children? Pets?
  7. What is it used for? Is it decorative? Does it have a function? Both?
  8. What does it feel like? Is that scarf soft to the touch? What's the texture like? Is that necklace very heavy?
  9. How does it work? Does it slip over my head? Is there a clasp? Do I tie it around my waist?
  10. Why is this one better than the one in the next shop? What special skills, materials, or ideas do you use that make your item the best?

  11. Do I get everything in the picture? I see 12 items in your picture, do I get them all? Only one? Does that lovely bauble in the background come with it or is it just for display? 
  12. Will it fit me? When I shop in a brick and mortar shop I might try on 12 things and find only 1 that fits well. I am taking a BIG chance on buying clothes online. Please make it easier for me by offering extensive measurement and sizing information. Don't assume that your customer will know what you mean by "small" or "large."
  13. What if it doesn't fit? Am I stuck with it? Will you exchange it? Who pays to ship it back?
  14. Is it ready to use? Is that painting ready to hang? Do I need to frame it first?
  15. How does it arrive? Is it gift wrapped? Is it ready to ship or is it made to order?
  16. Will I get the EXACT item in the photo? Is it a stock photo or do I get the exact item?
  17. Is it gonna stink? Does that vintage item have a funky, musty odor? Does the seller smoke while he creates that item?
  18. How do I know it's "vintage"? What kind of research did you do to determine how old that item is? Is it marked? Is there a date on it? Are you experienced with vintage and antique items?
  19. What do those fancy terms mean? Don't take for granted that your customer knows what a cabochon is or what giclee or gocco means.
  20. Can I live without this item? Chances are your customer can easily live without your items. It's your job to SELL it to them. Let them know why owning this item is so wonderful. Are they going to feel like a princess with that lovely bracelet? Is that platter not only functional, but makes a wonderful work of art? Is that item the perfect gift for hard-to-buy-for people? Does the item evoke certain emotions? Tell us what's so great about it!
Have a question to add? Feel free to join in the discussion by adding to the comments below or participating in the original Forum post.

Turquoise Splendor

Turquoise Splendor was my first large-scale piece. I made it in 2006 while I was living in my first apartment, working my first job fresh out of Indiana State U. Making it was a wonder for me. As it came together, I knew I was reaching a new artistic stage in my life. I felt something meaningful brewing.

Before Splendor, I was using herringbone, right-angle weave, netting, peyote and many other stitches just to make cuffs, and I wanted to try something new. Subscribing to Beadwork and Bead and Button Magazines really was my inspiration at the time, and I loved how the artists were encasing cabochons and stones, and many other things to make pendants from beads. So I gave it a go myself.

I made tiny right-angle weave squares for the backs of the little glass tiles, then started a box shape by adding beads around the outside of the square. To close off the tile inside the box I started adding size 15 seed beads to decrease and pull close the opening so the tile couldn't escape. And lookie there! A little piece of artwork! I wanted to stop there and just make a necklace out of that but a little voice told me to make a bunch and do something with them later. I kept beading.

It's great when I have a lot of little parts to assemble, rather than one large piece to create. It helps me focus on something small as part of something large, rather than part of something large! I get overwhelmed and lose my motivation. I made this necklace piece by piece and assembled it at the end, coming together as Turquoise Splendor. I made peyote stitched beaded beads out of the two colors of beads I was using for the little tiles, and ended up with a great big necklace that I really treasure.

It wasn't over, however. Even though this one was complete, I had done something different. I had gone to a new level, and knew in my heart that I needed to do another one. Thus began my beadwork career. 

Ever since, I have been visiting the beach every year or so, discovering new creations the sea brings to our feet.  I incorporate these treasures into my work.  You can view them all on my Etsy page.